To no one’s surprise: privacy is a big deal nowadays. With laws like GDPR and CCPA and the new consent mode from Google, having a cookie consent banner on your website isn’t just a good idea – It is a must. This banner informs visitors about the cookies you use and lets them choose to accept or decline, building trust and staying compliant.
I tried several third-party options to implement a cookie consent banner on hgency.be, but I couldn’t find a complete solution that was easy to use, transparent, and reasonably priced. So, I decided to build my own cookie banner on Google Tag Manager with Klaro. It turned out to be the best solution to easily control the third party cookies and remain compliant.
In this post, I’ll show you how to set up a cookie consent banner with Google Tag Manager and trigger your marketing tags based your users’ consent preferences.
Disclaimer: I am not a legal expert. For the creation of your cookie policy and to ensure that your marketing tags comply with regional regulations, please consult a qualified lawyer. This information is provided for guidance purposes only and should not be considered legal advice.
Agenda for today:
- Implementing a cookie consent banner using Google Tag Manager
- Setting up consent mode in Google Tag Manager
- Apply consent settings to trigger your tags
Implementing a cookie consent banner using Google Tag Manager
Websites are not allowed to place cookies on users’ devices without first collecting their explicit consent. Cookie consent banners were created to address this need: they collect and store visitors’ consent.
So your cookie consent banner should serve two purposes:
- It allows your users to give their consent for third-party cookies
- It stores their consent in a cookie
You already have a cookie consent banner in place ? Jump straight to setting consent mode in Google Tag Manager
To build my cookie consent banner, I used the free version of Klaro. It’s an open-source project that can be implemented through Google Tag Manager. You can access all the required code and documentation in their GitHub repository. Although the code available in their GitHub may seem intimidating, I managed to find my way through it with close to zero coding skills.
Creating the cookie consent banner tag
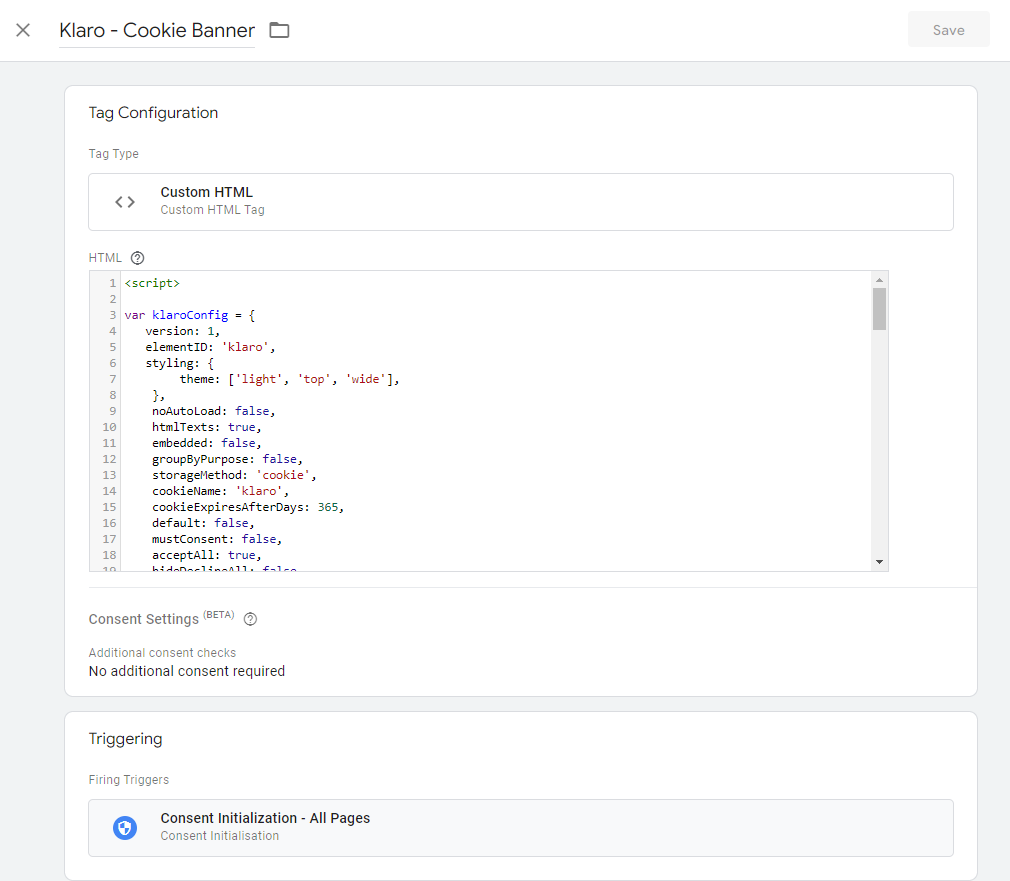
The Klaro cookie consent banner can be implemented using a custom HTML tag. In the example below, I have named mine “Klaro – Cookie Banner.” Feel free to adapt the name to reflect your naming convention.
Use the trigger “Consent Initialization – All Pages” trigger in order to load the banner and set consent before other tag is loaded.
Configuring you cookie consent banner
The HTML code of the Klaro banner is relatively straightforward to configure. You first need to specify the config then load the script itself. Their documentation is quite helpful. If you don’t want to start from scratch, feel free to copy / past my setup and adapt it to your need. It’s available here on Github.
Here is the config I use for my banner:
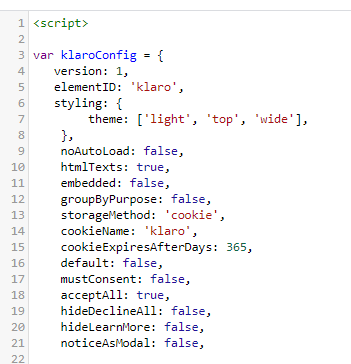
I specify where the banner should be displayed, how the consent is stored, the mandatories etc.
After the config, come the services you want to display:
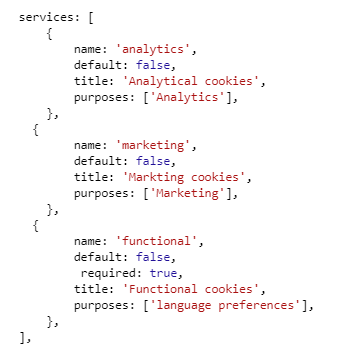
In my case, I collect consent for Analytics (GA4), Marketing (which I will use to trigger my Google Ads and Facebook Ads pixels) and functional cookies. This list should include all cookies used by your website. For the functional cookies, I used the required parameters as they cannot be blocked on my website.
Here is the final look of the cookie consent banner as I configured it:

Checking that your consent banner works
You have pushed your tag live and your banner is being displayed on your website? Good ! Now let’s check that the consent granted through the banner is stored and available in a cookie.
To see the cookies stored in your browser, right click on your website -> Inspect and open the Application tab. You will access this table:
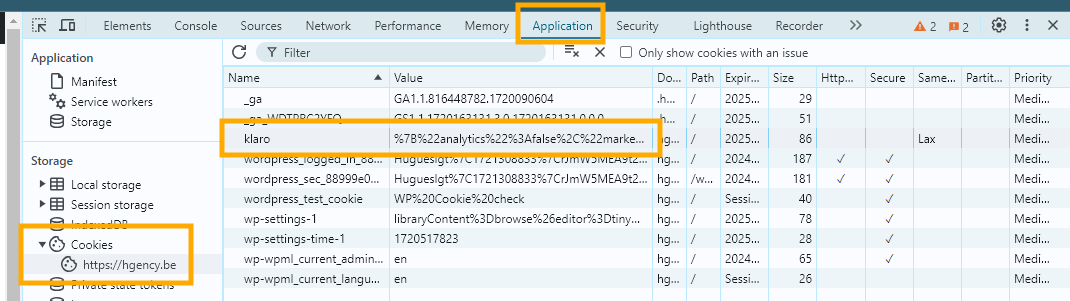
If you use the default setup of the banner, the consent permissions are stored in “klaro” cookie under your domain. In my example, the banner shows true for all cookies:
%7B%22analytics%22%3Atrue%2C%22marketing%22%3Atrue%2C%22functional%22%3Atrue%7D
I gave consent for both analytics, marketing and functional cookies.
To run other tests, simply delete the cookie by selecting it in the list and pressing delete. The banner will pop up again once you reload the page.
Setting up consent mode in Google Tag Manager
Now that you collect and store your users’ conset in a cookie, you want to make this information available in Google Tag Manager.
Setting up consent mode tag
The first tag that we create sets the default consent status. It will be used until the user provides his consent. To set this up, I use the Consent Mode (Google Tags) from Simo Ahava. The tag is available from the community template gallery in the top right corner when you create a new tag.

Here is the tag configuration:
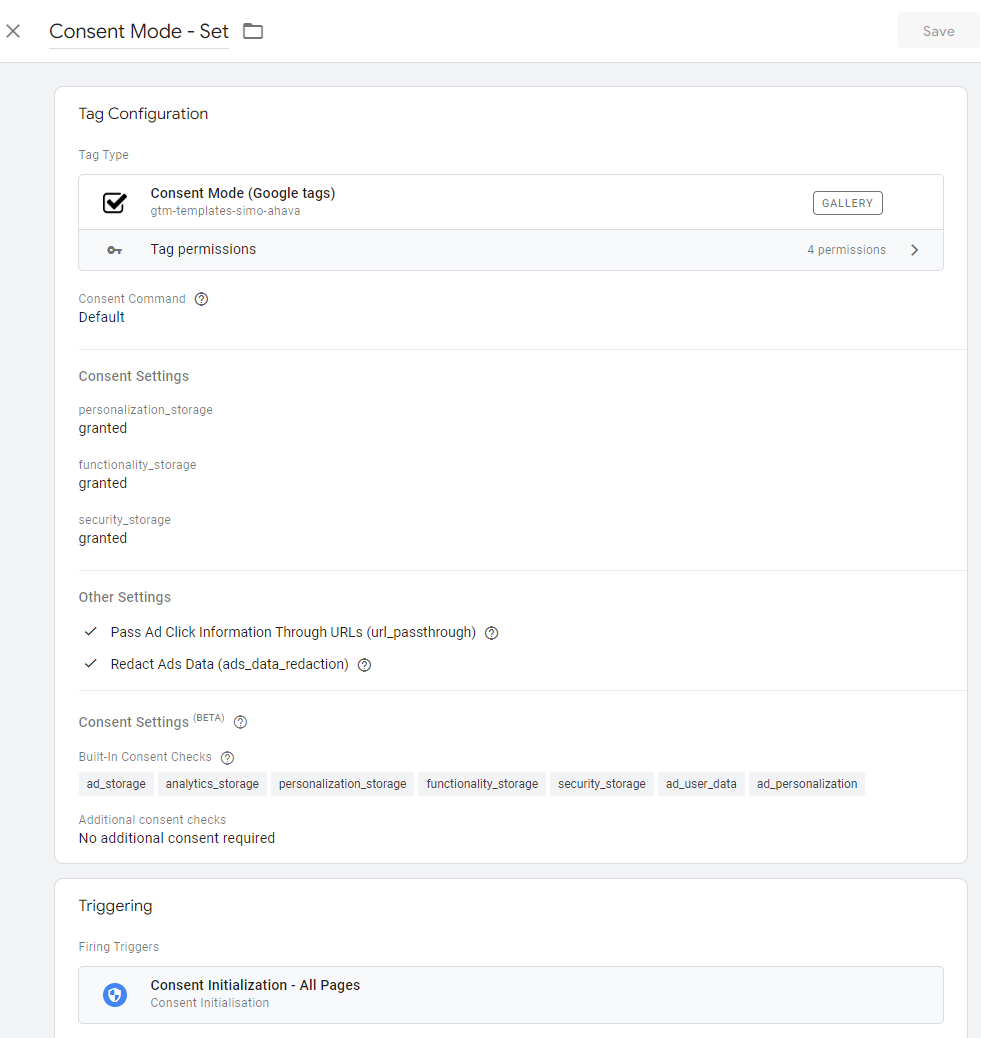
The default consent settings of your tag depend of the regulation in place where target audience is located. In my case, I use:
- Ad_storage, Analytics_storage, ad_user_data and ad_personalization: denied
- Personalization_storage, functionality_storage and security_storage: granted
- Pass Ad Click Information through URLs (url_passthrough): checked
- Redact Ads Data (ads_data_redaction): checked
- Trigger: Consent Initialization – All Pages
With these parameters, when you first land on hgency.be, all ad-related and analytical cookies are set to “denied”.
Enabling url_passthrough allows you to retain URL parameters such as UTMs in case users grant their consent later in their visit.
Create cookie consent variables
The next step is to create a variable that will retain the answers stored in your Klaro cookie. For this, go in variable and select “1st-Party Cookie” as variable type.
By default, the name of the cookie where consent is retained is “klaro”. You can verify the name of your cookie in the application tab described earlier.

After you have created the variable, you can check that it retains the cookie content with the debug mode from Google Tag Manager:
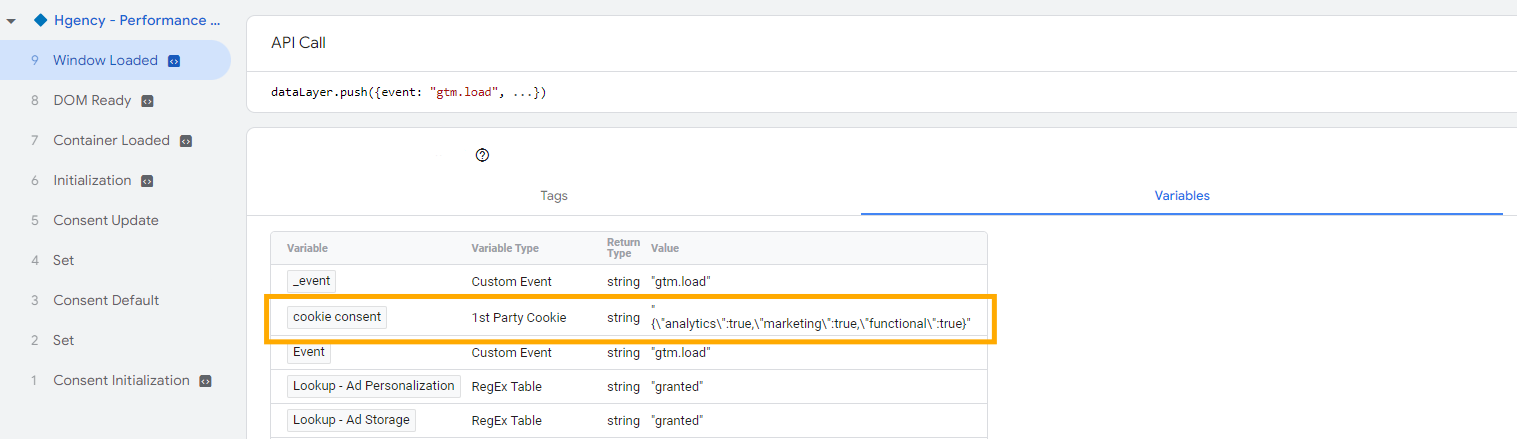
The content of my cookie is now available in the variable.
Google consent mode requires four types of consent: Ad Personalization, Ad Storage, Ad User Data and Analytics Storage. That means we need a separate variable for each one.
To split up my cookie consent variable in four individual variables, we need to use a lookup variable. It allows you to isolate each consent type.
Here is an example of the lookup variable for ad_storage variable:
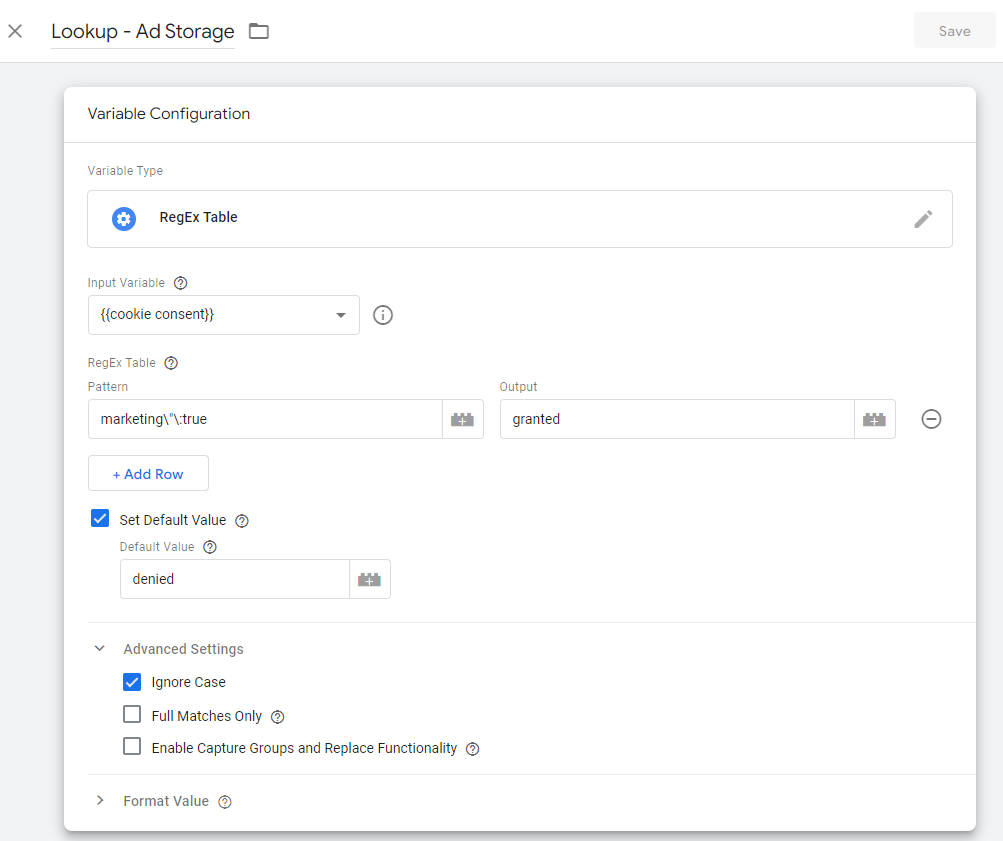
Parameters:
- Type: RegEx Table
- Input: use the variable created at previous step
- Pattern: copy the relevant part of your variable (use a “\” before all special characters to avoid RegEx errors)
- Default value: denied (depending on what should be applied if no consentment is given)
- Ignore Case: check
- Full Matches Only and Enable Capture Groups and Replace Functionality: unchecked
You may have noticed that I don’t collect Ad Personalization, Ad Storage and Ad User Data consents individually. In my case, they all fall under the marketing category.
Updating consent mode status based on users’s preferences
At this stage you have set a default value for consent and you store your users’ consent. So the last step is to update the default consent status with the values stored in the variables.
In order do do this, another consent mode tag needs to be created with “Update” set as consent command:
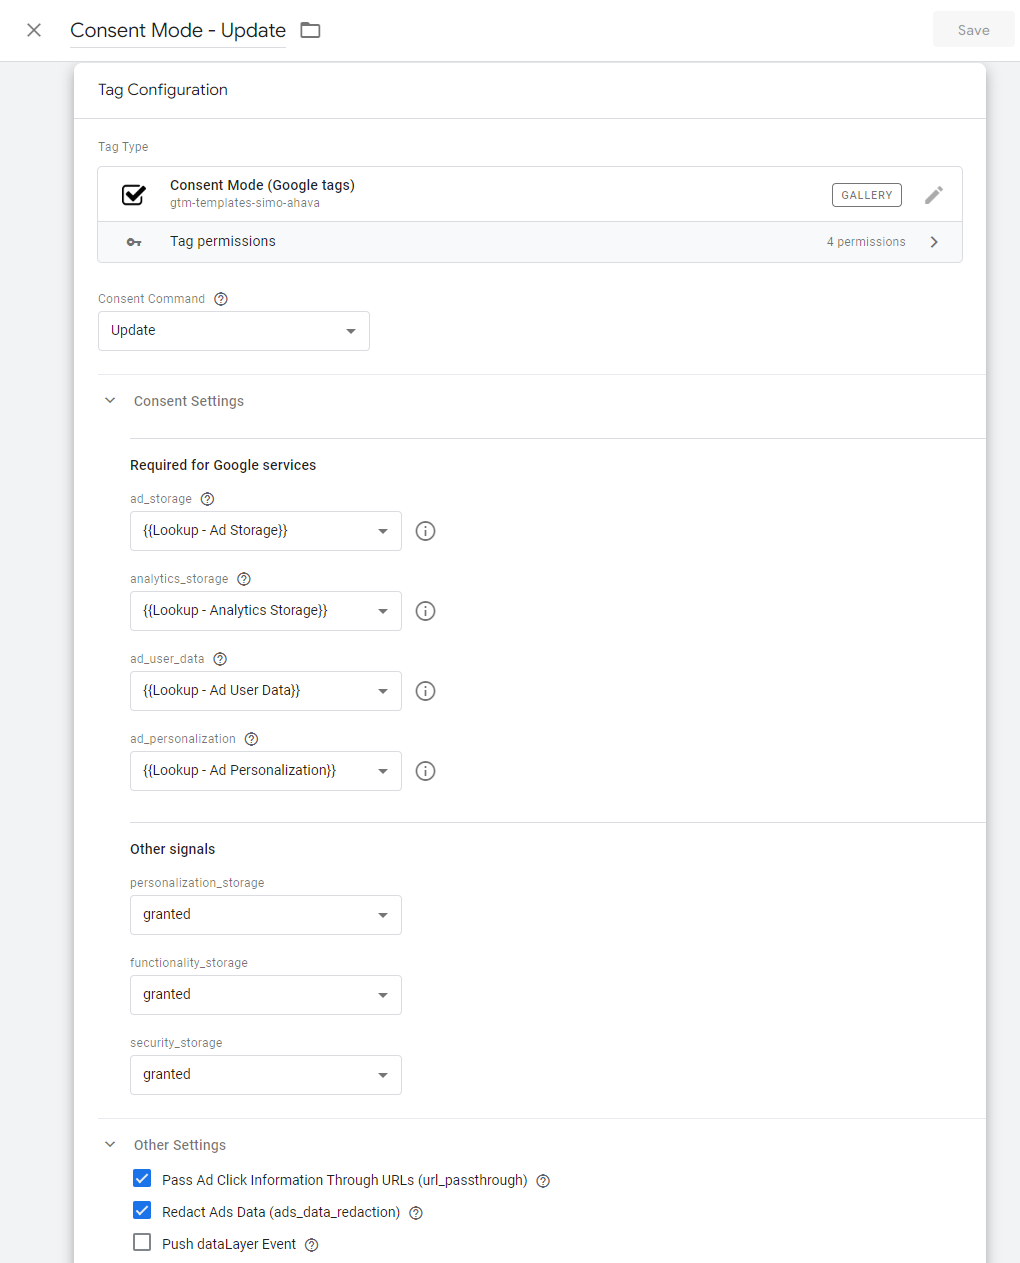
Parameters:
- Consent command: update
- For each of Google services, select the appropriate variable
- Pass Ad Click Information and Redact Ads Data should be checked here too
- As trigger, use “Consent Initialization – All Pages” again
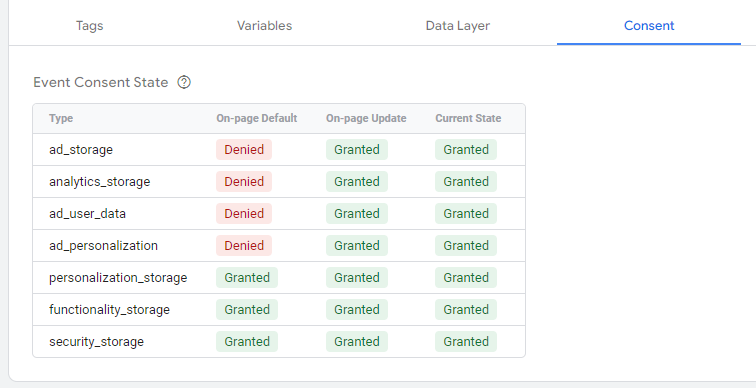
Once you push this tag live, you should see the status of your users consent change depending on their choice. See the status of consent on hgency.be once a user gave consent for all cookies:
Apply consent settings to trigger your tags
You can now activate consent overview from your container settings. This option will allow you to use consentment as trigger for your tags. To get there, click on “Admin” then go into “Container Settings”. Tick the checkbox for “consent overview” below “additional settings”.
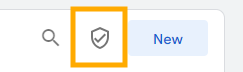
You will now see a consent overview icon on the top right of your tags in Workspace:
In this menu, you see an overview of all your tags and their built-in consent checks. Select the consent required for each one.
Here is the setup used for my Google Tag:
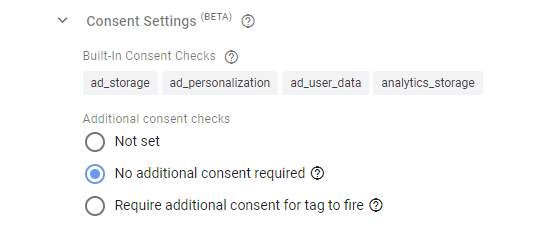
The Google Tags come with pre built-in consent checks. So that means no additional consent is required. They use the conset stored in your variables.
For tags from other platforms you need to specify which consent is required, if any is required. In that case, pick the third option: require addtional consent for tag to fire. From there you can manually choose the required consents for the tag to fire.
Go through each of your tags, pick the right parameter and… that’s it ! You are now all set.
I hope you found the article useful. Feel free to reach out for comments, questions or recomandations.